Overview
MenuPro is a menu creator that is simple to use but allows for great flexibility in customizing your menu design. It's different than most word-processing or template editors in 2 key ways:
1 It lets you keep your food items in a list (a database) that is always accessible. This lets you create menus by dragging from the list rather than retyping. The list also allows content and design to change independently, letting you change your menu design without having to edit your list, and vice versa.
2 The design and layout of your menus is controlled by Menu Styles - blueprints that tell MenuPro what design elements to use and where they should go.
Menu Styles are more flexible than garden variety, word-processing style templates because:
- You're less restricted to how many items you can fit on the page.
- Your menu can be any page size since Menu Styles are size agnostic.
- You can preview and swap designs with 1-click using your actual menu text since all Styles are interchangeable.
- You can customize most elements of any Menu Style to create something truly unique.
The last point is particular important because it allows you to 'brand' your menus to match your restaurant's personality, so you can avoid being stuck with an unoriginal design.
Steps to Create a Menu
The easiest way to get started is to add a few foods and headings, and then drag them over to the menu. You can then flip through the Menu Styles to get a quick take on how it works:
Here are the steps to get started:
- Start MenuPro
- Select
View > Normal(just to make sure you can see the 3 main windows) - Select
File > New Menu - Right-click in the Food Items window (the one at the upper left) and select
New Food Item - Fill in Food Item fields for Name, Description and Price and then click
OK. You can repeat this step to a add a few Foods Items. - Now Right-click in the Headings window (the one at the lower left) and select
New Heading - Enter the Heading text such as 'Appetizers', 'Starters', etc. then click
OK - Now click and hold the Heading you just created and Drag it over to the menu and Drop it. Next drag some Food Items to the menu in the same fashion - drop them under the Heading in the order of your choice.
- Once you have few items on the menu you can a) click and drag to change their order b) click to edit them c) right-click them and select
Remove from menu(or click to edit and uncheck theOn Menubox, then clickOK). - Next, try clicking the
Stylebuttons on the toolbar (the ones next to the FIT button) to see what your menu looks like with different designs. - Finally, at any point during the process, click
Printbutton on the toolbar (the little printer) or useFile > Printto print your menu.
Tip! If you'd like MenuPro to suggest a Menu Background (Watermark) with each menu style, double-click the little gear icon under the Menu that says Auto-Background (this will open the MenuPro Options window) and then put a check in the box that says Auto-background when switching styles and then click OK
Switch Menu Styles
You can switch Menu Styles at any time using the Design > Switch Menu Styles command to choose a specific Menu Style.
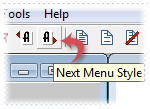
Or you can click the Previous Menu Style or Next Menu Style buttons on the toolbar to cycle through all the available styles.
Video Demo
In this short video you can watch how the Drag and Drop and Style Switching works.