How can I use columns on my menu?
The easiest way to use Columns in MenuPro are:
Method 1. Double-click any normal Heading on your menu.
Then check the box under Layout Options that says Items in Columns: 2 (this puts just the food items under that heading into 2 columns).
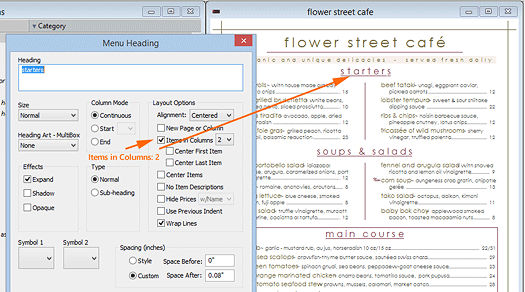
Example where Starters uses Items in 2 Columns
Method 2. Select Design > Menu Style and under Column Options, change the number of columns from 1 to how many columns you want (this puts your entire menu into columns).
Here's an example of a Wine List using 2 columns with the New Page or Column set for Pinot Noir for Column 2
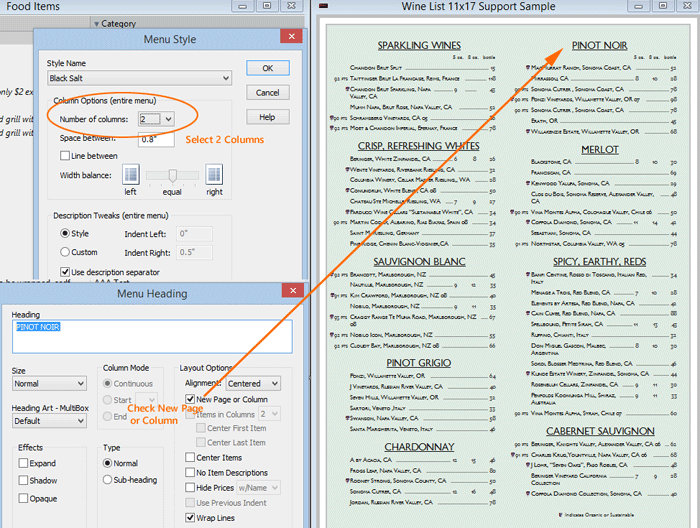
Example of 2 Column Wine List
Video: 2-Column Layout Change with a Click
In this video we use Items in 2 Columns to put Appetizers into 2 columns.
You can find about more about columns while in MenuPro by Clicking F1, and then click the Search Tab, and then type columns into the search box.
How do I get my own logo or image on my menu?
First get your logo scanned to an image file. Many print shops like Kinko's will do this for just a few dollars.
Or, if you already have your own image(s) on your computer you can add it to your menu like this:
1. From the MenuPro menu bar click Insert > Picture
2. Select the file type in the Files of type drop down box near the bottom of the Insert Picture window. If you don't know, just select All MenuPro Formats
3. Browse to the folder on your computer where your image is located using the Windows folders next to where it says Look in: at the top of the Insert Picture window.
4. Once you see your image in the file list, just select it and click OK, and then click anywhere on your menu to place the image. It doesn't have to be exact, you can easily move it or resize after it's on the menu by clicking and dragging it or double-clicking it.
Tip! We recommend saving all your logos in the MenuPro 10 Default Menu Folder, which is MenuPro Menus, so when you do a MenuPro Backup, the logo files will be backed up as well.
Video: How to add or remove an image
In this video we remove an image that's already on the menu and replace it with a new one.
Making Room for your Logo
With MenuPro, you can place your logo anywhere on the your menu and can easily resize or scale it to any dimensions. But sometimes you may need to move the menu text for the logo to fit where you want it. In that case, the easiest approach is to use the Custom Spacing feature that's available for each menu item.
MenuPro comes with pre-defined spacing for each Menu Style, but you can override that spacing for any Menu Heading or Food Item by double-clicking the item on the menu and then entering a Custom Before or After spacing value (lower right hand corner of the dialog box).
For example, let's say you need extra space before your first menu heading Appetizers for your Logo to fit at the top of your page. Simply double-click Appetizers and then click Custom under Spacing and enter a value in the Before field such as 1.0 (for one inch). Then click OK.
After doing so, 1 inch of spacing will then appear before Appetizers giving you some extra room to add your logo.
NOTE Custom spacing is best suited for special cases where only one item needs more or less spacing. For overall spacing on a menu page, use the Spacing buttons on the toolbar to add more or less spacing for the entire page. You can also tweak how the spacing buttons operate by using the File > MenuPro Options command and then sliding the Page Spacing Adjuster.
A second way to make room for pictures is to disable the Wrap Lines feature for any food item or heading. Unchecking Wrap Lines lets you format your menu text exactly as typed as if using a text editor. This allows you to insert Line Breaks (using the Enter key) to make room for pictures on the side of your items. The Wrap Lines checkbox is available in every Heading and Food Item box.
2 Easy ways to create Multi-Page Menus
MenuPro lets you create menus of any number of pages.
Here are 2 easy ways to get to page 2 and beyond with a new menu.
1. Keep dragging Menu headings and Food items onto page 1 of your menu and drop them under the last item on the menu until there is no more room on page 1. When this happens, the next item will spill over onto a page 2, which will be automatically created to accommodate that item.
OR
2. For any Menu Heading that is on page 1 - double-click the heading to edit it, and check the box under Layout Options that says New Page or Column. This will cause MenuPro to create a page 2 with that heading at the top of the page (this applies to menus where the overall number of columns is set to the default of 1).
Tip! Once you have more than one page, the status bar (at the bottom of the MenuPro) will say page 1 of x where x is the total number of pages of your menu. You can now use the Page Buttons to flip back and forth between the pages.
On the bottom status bar
How do I create a Menu Cover Page or Flyer?
You can easily create Menu Covers and Flyers of all shapes and sizes with MenuPro. Follow these steps for a quick Cover or Flyer:
1. Start a new Blank Menu using the File > New Menu command.
2. If you want a custom shape or size, use the File > Page Setup command and choose your size.
3. Add your logo or any other images you want on the Cover or Flyer using the Insert > Picture command.
4. Add your Restaurant Name text or any other text you need using the Insert > Floating Text command (floating text can be positioned anywhere on the menu and you can use any font, any color, any size, and have as many Floating Text blocks as you want, so it's ideal for creating Covers or Flyers).
5. If you want, you can also add a Border which is sometimes useful for Flyers or Covers using the Design > Border command.
6. Save your Cover or Flyer using the File > Save Menu As command.
Some examples of Menu Covers and Flyers that created this way can be found here
Adding a blank Cover page
You can create a blank cover page in MenuPro 10, that contains just your logo or floating text, by doing the following:
1. Go to File > MenuPro Options and check the box that says Auto-blank first 'new page/column' heading
2. Start a new Blank Menu using the File > New Menu command.
3. Add a heading to your menu if a sample heading is not there already.
4. Edit the heading and check the box that says New Page or Column and then click OK. Once you click OK MenPro will automatically insert a blank heading on page 1, allowing the heading you just edited to move to page 2.
5. You can now add your Logo or any Floating Text to page 1 without the need to have foods or headings on page 1.
6. When you're ready, save your menu using the File > Save Menu As command.
How can I use multiple prices per food for Pizza Menus and Wine Lists?
Many menus require more than one price for a single food item - Wine Lists and Pizza Menus are two examples.
To have more than one price per food item, do the following:
Procedure
1. For each food item that you want more than one price, edit the food item and enter one price in each price field ('price' will print furthest to the left, 'lunch price' will print next, 'breakfast price' next, and so on) and then check the box below the prices that says Use All Prices. This will cause all prices entered for the food item to printed on the menu.
2. Once your food items are on your menu, use the Design > Price Options command and select Price Format Normal. You can also use the Price Column Adjuster to adjust the space between the prices.
3. Finally, if you'd like a heading above the foods that describes what what the price columns refer to, enter a new Heading and make it type Sub-Heading and make the Layout Option > Alignment > Right for this heading. For the text, enter whatever the columns mean separated by a few spaces. For example 'small large' or 'glass bottle'.
4. Drag the sub-heading and drop it on the main heading for this group of foods. For example if your main heading is Pizzas, drag this subheading and drop it on Pizzas - since its a type sub-heading, it will appear under the main heading but before the foods that follow. Depending on the Menu Style you are using, you may need to add more or less space between the descriptive words that describe the columns.
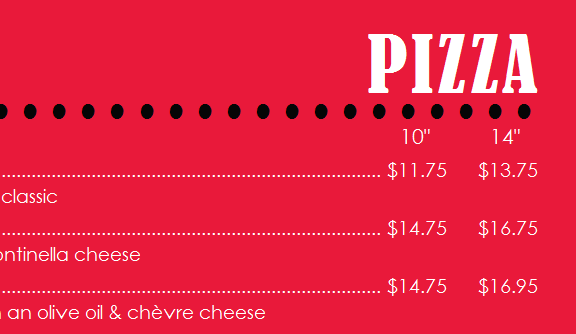
Pizza example with multiple prices per pizza
PDF examples:
View a PDF pizza menu we created using this technique: here
View a PDF wine list created with the same technique: here
Creating a Tri-fold menu from existing menu
You may want to turn a completed in-house dining menu into a tri-fold menu that can used for carry-out. Below are some tips on how to do this.
User Guide
See the sub-section in the MenuPro User guide Carry-Out Menus under the main section Creating a New Menu. This information is also available from within MenuPro by clicking F1 and searching Help for 'Carry-Out'.
Procedure
1. Open your existing menu in MenuPro.
2. Choose File > Save Menu As and in the Save Menu As box type in a name that will be for your new Carry-out menu.
3. Choose File > Page Setup and set the page Orientation to Landscape. Adjust the left and right Margins if needed. You may also want to adjust the Paper Size here also if your tri-fold menu is going to use a different paper size than your in-house menu.
Tip! To see where the paper folds will be, choose View > Paper Folds > Tri-Fold then adjust the Space between columns and Page Setup margins so the menu appears balanced when folded.
4. Choose Design > Menu Style and set Number of columns to 3. Adjust the Space between columns if needed. The rule of thumb is the Left and Right margins should be the same as the Space between columns or, when added together, should equal the Space between the columns. For example, if your Left and Right margins are 0.5, then set the Space between columns to either 0.5 or 1.0.
5. Finally, you may need to make some minor adjustments to make your menu fit within the tri-fold. If you want to keep your present menu style, you can change the font sizes using the Grow/Shrink font buttons or change the spacing using the Spacing buttons on the toolbar, or you may want to choose a different menu style altogether that has tighter spacing.
Tip! Some Menu Styles have the item description on the same line as the item name and this is often useful for tri-fold menus as it saves space. Click the Menu Style buttons on the toolbar until you find a style that suits your needs.
Can I have more than one food item list (database)?
You may want to use more than one food item list (database) with MenuPro (8, 9, or 10) on the same computer. Below are some suggestions on how to do this.
User Guide
See the sub-section in the MenuPro User guide - Food Categories. This information is also available from within MenuPro by clicking F1 and searching Help for 'Categories'. We strongly suggest trying Categories first to organize your foods, even if you have more than one restaurant.
Categories provide a method of organizing your food items in the database, and may be all you need to separate out and organize food items from multiple restaurants or other situations where you want to group certain food items together. If not, see below on how to achieve multiple food item databases on the same computer.
Procedure
NOTE This procedure requires understanding of using multiple User accounts under Windows. If you do not know how to set up and use User accounts under Windows, consult Microsoft's Help system for answers or contact a Microsoft Support specialist for help.
Using Multiple Food Item Databases on the same Computer with MenuPro 10
1. Install and activate MenuPro on your PC under your user account (make sure your account is set up to be an admin account with admin privileges). When you get to the installation screen that asks if you want to install for Anyone or just You (the current user), choose Anyone.
2. Run MenuPro under this account. This will be your first food item database. Any menus you create under this account will use the food items from this database.
3. Log off your Windows account and then Log On (switch to) another User account on your PC (if you don't already have another user account on your PC, then create one from the Windows Control Panel). When you log on to the new user account, the MenuPro icon should be already be on your desktop.
4. Run MenuPro on the new User account - your food item database will be new and will not contain foods from your other user account. Menus created under this account will use the food items from this new database.
5. You can now switch back and forth between User Accounts to access whichever food item database you want.
Important! Menus created under one user account should never be opened under the other user account. Doing so will cause the menu to become corrupt and you will lose food items from the menu. Always save your menus into the Default Menu Folder under the user account that is in use - do not save the menus into the Windows Public folder and then try to share menus between accounts as this will cause data corruption.
What's the best way to accurately position images on my menu?
The easiest way to position images on your menu is to make your menu window as big as possible. You can then simply click and drag your images to position them. If your menu window is big enough, the images will be accurately positioned. In MenuPro 10 you can also display a Grid by selecting View > Paper Folds > Grid. You can change the Grid units by selecting View > Paper Folds > Grid Options
The bigger your monitor, the more accurately the images will be positioned. If you are working on a small monitor or want a higher degree of accuracy, you can double-click the image to edit it, and then enter the position under the Position fields in the Edit Picture box.
Keep in mind that the position entered starts at the top, left corner of the image including any white space that the image may have. So if your images have a lot of white space, you're better off using the click and drag method.
There is also Tools > Align Pictures that lets you align pictures along certain spots like the center of the page or the left margin or a user selected point.
