Decrease the bottom margin to get more items on a page
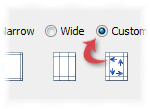
One of the easiest tricks to get that last item on the page that presently gets moved to page 2 because there's not enough room on page 1, is to simply increase the bottom margin using File > Page Setup.
MenuPro was designed to have generous top and bottom margins to leave room for possible borders, headers, and footers. But if you're not using any of those and you've got room to spare, change the bottom and even the top margin to 0.5 or less, or select Narrow from the Quick Margin setup choices.
The extra room afforded by a narrow bottom and top margin will usually allow at least one, or even two, more items to fit on the page.
You can of course use the FIT button and the Page Spacing buttons also, but the margins is one that many users overlook as a way to get more on the page.
Gigantic Fonts
The Design > Change font dialog box appears to limit font size changes to 72 points, but you can manually enter a font size in the Size box of up to 100 points. This comes in handy if you're looking to super-size your fonts.
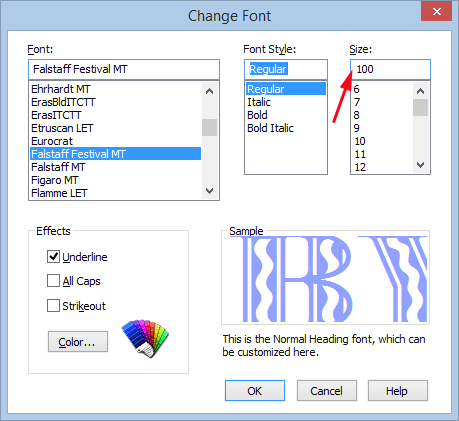
100 Point fonts are possible
Negative Spacing
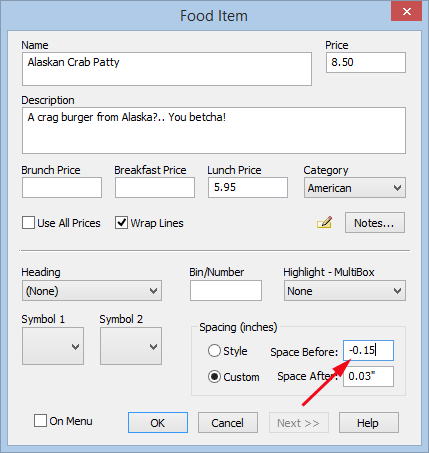
On menus that require Custom Spacing for just a few headings or food items, to get extra close and shrink the spacing even more than it appears possible, you can enter a negative number for the Before or After values for Custom Spacing.
For example, let's say you want a menu heading to be so close to the heading above it that they almost touch, but when you enter a value for 0.0 in the Space Before for heading below, the heading still does not get close enough to heading above it. In this case, try entering a negative value, such as -0.15. This negative value will be applied to the Space Before in just that fashion - it will move the heading up beyond zero by the negative value entered.
How to Join 2 PDF Menus together
MenuPro 10 has the ability to attach (concatenate) a PDF menu to another PDF menu or file. A late addition to the MenuPro 10 feature set that did not make it into the user guide, here's how to do it:
1. Instead of using the PDF button on the Toolbar, select File > Print
2. For Printer, select MenuPro PDF Converter
3. Check the box that says Concatenate PDF under Options
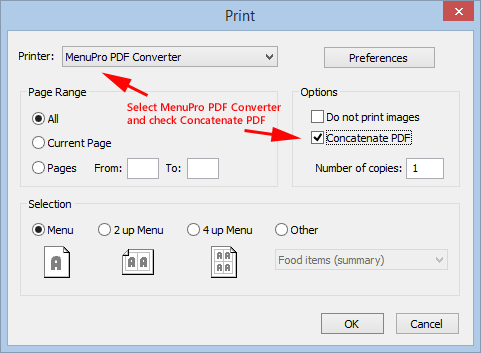
MenuPro Concatenate PDF Menu option
4. Click OK in the Print dialog box.
5. You'll now be prompted to choose a PDF file name. If you choose an existing PDF file, MenuPro will concatenate (join) your current menu to the end of the existing PDF menu.
After the printing is complete, when you open the PDF file both menus will be attached - appear as one PDF - with your current MenuPro menu following the existing menu.
This allows you to combine any number of Menus or Menu Pages together into one PDF file as you can do this any number of times. The menus don't even have to be the same page size. You can combine your in-house dinner menu with your carry-out menu, your lunch menu with your breakfast menu, etc.
You can also use this feature to concatenate a PDF menu with a PDF file that was not created in MenuPro. So you could concatenate a PDF Menu to a restaurant brochure, a promo sell-sheet, or any other PDF Document that you have on your PC.
Changing the font for specific Foods
A late addition to the MenuPro 10 feature set that did not make into the user guide is the ability to change the typeface (font) for selected food items.
This feature works in conjunction with the food item Highlight feature and is applied to each food item that is selected to be highlighted by Font or Box (+Font).
To use it:
1. Edit a food item and under Highlight select Font.
2. Then go to Design > Highlight Options where you can change the color for the Food Item Highlight Font for item name, description, and price.
3. Here, (in MenuPro 10 only) you can also change the item name typeface by checking Use Custom under Item Name and then clicking the Font button, and then selecting a new font.
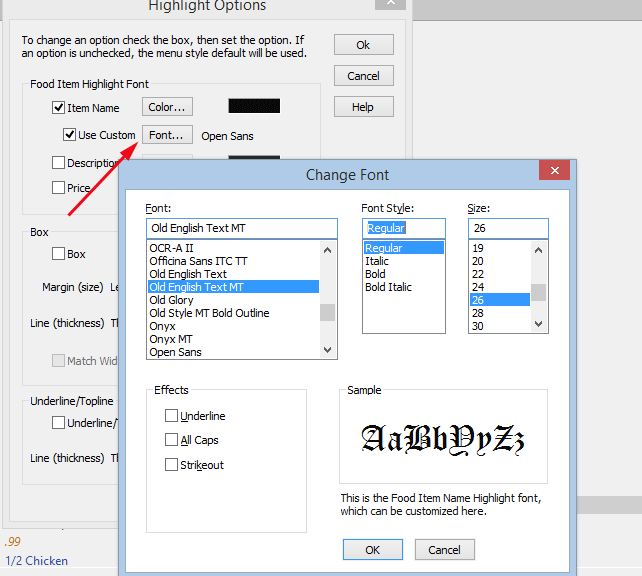
Click Font then change the font
This feature allows to have selected food items appear with a different Name Font to make them stand out on your menu.
Differentiating between Food Items that have the same name
If you need to put a food item into the database that's named the same as one already there - maybe because the description is different for each and they appear on different menus such as lunch and dinner - there are two easy ways to tag the food items so you'll be able to quickly see which is which in the food list.
The first is to create Food Categories (you can access the Food Category window by selecting View > Food Categories and, once you have created some Food Categories, assign each food item to its own category.
The second is to use the Food Item ID field. The ID field is accessible by editing the food item, clicking the Notes button, and then entering some text into the ID field. You can then go to File > MenuPro Options and check the box that says Display ID's in Food Item List.
Food ID's don't get printed on your menu - they are used to 'ID' your items for identification in the food list
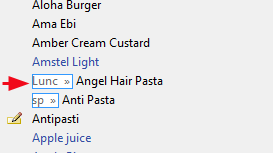
Example of food ids in the food list
Once this is done, in your food item list any food item that has an ID will appear with that ID preceding the food item name. So you'll be able to quickly distinguish between two or more food items that have the same name, as long as they have different ID's.
View more pictures and images
When you use the Insert Picture command or the Menu Background command in MenuPro 10, a file selection window appears along with a Preview window.
In the lower right corner of the dialog window, you can click and grab the window and resize it. This lets you view more images in the left-side file list.
Depending on the view you have selected under the Windows view menu (next to the new folder icon), you'll be able to view some of the images (depending on image type) even before they appear in the Preview window.
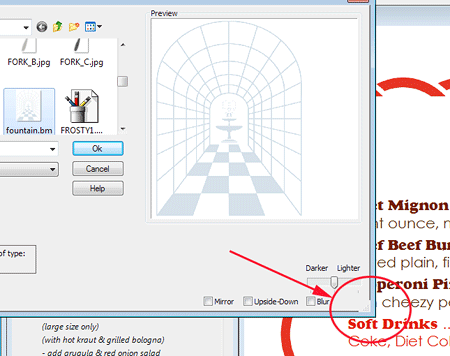
Click and drag the corner to enlarge the preview
Sort food items by their order on menu
Sometimes it's useful, especially if you have a large food item list, to sort the food items by their order on the menu. This puts all food items that are on the menu at the top of the list, so you can quickly make changes or edits to just those food items.
To do this simply click in the gray bar to the left of where it says Food Item
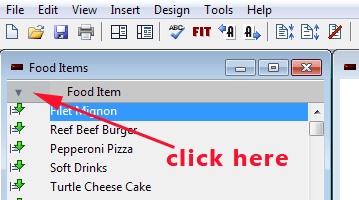
Click to the left to sort by Order on Menu
Your food items will be then be sorted by the order they appear on the menu.
Ctrl-Left-Click to add food items to menu
Even faster than drag and drop is Control-Left-Click, a feature that appeared as early as MenuPro 4 but was later discontinued. By popular demand, it has been brought back for MenuPro 10
To use it, simply click the left mouse button while holding down the Ctrl key on any food item.
If the food item has been assigned to a heading it will be placed on the menu under that heading at the end of the list. If the food item has not been assigned to a heading, it will be placed at the end of the menu and assigned to the last heading on the menu.
Using this method, you can literally create a specials menu in seconds.
If the food item is already on the menu, Ctrl-Left-Click removes the item from the menu leaving the heading assignment intact.